This beginner-friendly tutorial outlines core taxidermy procedures for sheep. Strict adherence to safety protocols is paramount throughout. Use appropriate PPE: gloves, respirator, and eye protection.
Essential Tools & Materials
- Sheep Head/Hide: Acquire legally, ensure ethical sourcing.
- Sharp Knives: Scalpel, fleshing knife, precision knives.
- Borax/Taxidermy Preservative: Non-iodized salt or commercial tanning agent.
- Measuring Tools: Calipers for accurate form fitting.
- Taxidermy Forms: Polystyrene or urethane foam head form (size-specific).
- Clay/Epoxy Putty: For musculature modeling.
- Artificial Eyes: Properly sized and colored sheep eyes.
- Needles & Strong Thread: Curved upholstery needles.
- Tanning Agents: Commercial tanning kit if preserving hide long-term.
- Whiting Paste/Pumice: For final cleaning.
- Wires & Support Rods: Mandatory for structural support.
- Base Mount: Wooden plaque or suitable platform.
Core Processing Steps
1. Preparation & Skinning:
Refrigerate specimen promptly. Carefully make initial incisions along ventral midline and limbs. Employ a blunt dissection method to separate the hide from underlying muscle fascia, minimizing cutting risks. Pay close attention to delicate facial regions.
2. Fleshing & Preservation:
Remove all adherent muscle and fat meticulously. Apply a thick layer of borax or dry preservative liberally on the hide's inner surface. Fold hide flesh-to-flesh and refrigerate for 48-72 hours.
3. Tanning (Optional but Recommended):
Remove preservative and rehydrate if necessary. Follow specific manufacturer protocols for application of pickle and tanning agents to create a permanent, supple hide.
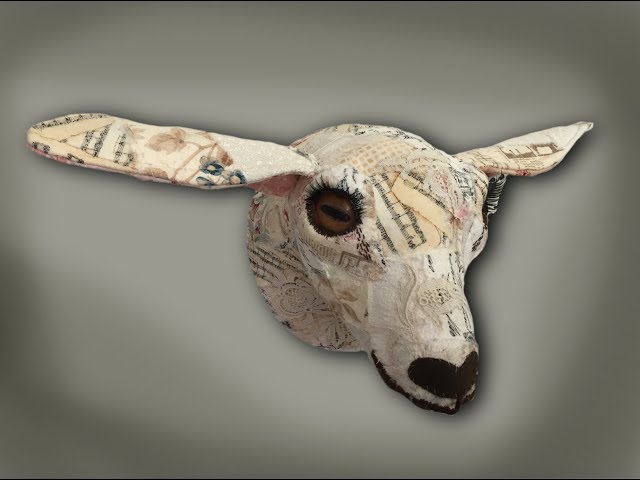
4. Form Selection & Modification: Match specimen measurements precisely. Carve the form significantly smaller than original measurements to accommodate hide thickness. Anatomically shape features using reference images. 5. Mounting & Shaping: Position the skull section securely onto the form with lag bolts. Reattach horns if applicable. Use wires for ear support rods and position artificial eyes carefully. Model musculature detail over the form with clay, focusing on eye orbits and muzzle. 6. Final Fitting & Sewing: Align key landmarks (lip margins, nostrils, eyes) perfectly. Tightly pull the hide. Execute precise stitching with a hidden seam technique. 7. Detailing & Finishing: Refine facial contours with pins or clamps as required. Apply whiting paste, let dry, then brush off excess. Position ears correctly and subtly shape nostrils. 8. Drying: Air dry slowly in a cool, ventilated, dust-free environment over several weeks. Practice fundamental techniques on smaller specimens initially. Patience and meticulous attention to anatomy are crucial for success.

Critical Safety Notes